Showing posts with label pattern. Show all posts

Sunday, January 12, 2020

Yoda, Yoda, Yoda

You've seen him everywhere so why not here? One of my best friends asked me to crochet a life sized baby Yoda for her, so I jumped on the bandwagon. I found a pattern and was able to snag it before it was taken down. I got the pattern from Ravelry.com by Allison Hoffman and her blog can be found at www.craftyiscool.com. She is super talented and has designed many characters.

Here is my finished piece made with Allison's pattern:

I also made some smaller ones using another pattern from amiamour.com. I made a few minor changes with the eyes and face. 


There are a lot of patterns out there for this little guy. Have you made one?


Tuesday, December 17, 2019

Woven Scarf Pattern

St. Francis Scarf
I named this scarf for the uniform colors of my son’s school and the first one made
was donated to the Francis House to give out with their Christmas gifts.


Materials:


  • Size I crochet hook (5.5 mm)
  • Worsted weight yarn in 3 colors. I used:
    • Red Heart Heat Wave (1 ball each)
      • Summer Night (Black - Color A)
      • Radio (Grey - Color B)
      • Luggage (Burgundy - Color C)


Pattern:

Mesh base:
In color A, Ch 33. Leave a tail about 6 inches long to blend in with fringe. 
Row 1: Dc in 5th ch from hook. *Ch 1, skip 1 ch, dc in next* to end. (16 dc)
Row 2: Ch 3 turn. Dc in each dc across chaining 1 in between each dc. 
Rows 3-7: Repeat row 2. (7 rows of color A) Cut yarn.
Rows 8-14: Join color B and repeat row 2. (7 rows of color B)
Rows 15-21: Join color A and repeat row 2. (7 rows of color A)
Rows 22-28: Join color B and repeat row 2. (7 rows of color B)
Rows 29-31: Join color C and repeat row 2. (3 rows of color C)
Continue the mesh base pattern:
7 rows of color A
7 rows of color B
7 rows of color A
7 rows of color B
3 rows of color C
7 rows of color A
7 rows of color B
7 rows of color A
7 rows of color B
Finish off your yarn ends.


Woven chains:

Make 8 chains of color A
Make 4 chains of color B
Make 3 chains of color C


Ch about 180. Leave a tail about 6 inches on each side to blend in with the fringe.
If you’re not sure the chain will fit, weave in one chain to see how well it fits within the scarf
then adjust accordingly. They should stretch a little to fit.
Weave 4 of the color A chains through the mesh, alternating directions.
So if you started with the first chain going over, under, over, under, then when you start the
second chain go under, over, under, over, etc.  
Weave 4 of the color B chains next. 
Weave 3 of the color C chains.
Weave the last 4 color A chains. 


Fringe:
String together 3 strands of each color about 12 inches long.
Make a larks head knot in each chain space, pulling in any tails. 
15 knots on each end of the scarf. Be sure to make the knots the same way for a clean look.

Fold the scarf in half and even out the fringe by trimming. 


Tuesday, January 17, 2017

Show & Tell Adorable Floppy

Someone was so kind to send this absolutely adorable picture of her daughter modeling her new floppy sun hat. Isn't she just precious?!

Get the free floppy sun hat pattern here.


Monday, January 16, 2017

Children's Head Warmer Pattern

  Here is a crochet pattern for a child's size head or ear warmer. It is almost identical to the adult sized pattern but it is a little shorter and more narrow as you can see below.


Materials:
  • Worsted Weight Yarn
  •  Size I Crochet Hook
  •  A button that will fit in between your double crochet stitches
  • Thread and needle
Abbreviations:
ch = chain
st = stitch
dc = double crochet
ea = each

Note:  First ch 2 counts as dc. 
    
Instructions:

Row 1: ch 6, dc in first 3 chs made, making 4 dc total.


Row 2: ch2, turn. dc in 2nd stitch from hook and each stitch across, including very last st. (5dc)


Row 2 will have 5dc
Rows 3-9: Repeat row 2. This will make an increase per row and you should end up with 12 dc in last row.
Row 10: ch 2, turn. dc in each st across, but NOT the very last st in order to maintain 12 dc. 

Rows 11-29: Repeat row 10.

Row 30: ch 2, turn. Skip first st, dc in each st across. (11 dc)


Rows 31-37: Repeat row 30 to continue to decrease. You will have 4 dc in the last row. 
Final piece is about 20" long

At this point you could fasten off or you could crochet a border. A simple hdc around looks nice and you could even do it in a contrasting color. Another border stitch I like is the crab stitch, also known as reverse single crochet as seen below.
Crab stitch border


I love seeing finished products from my patterns. If you want to be featured on my blog with your finished items, just shoot me an email. If you don't want to be featured but still want to send me pics, that's great too! Just let me know in the email if you want me to post your pics or not.


                                                         Copyright 2017 PerfectMix Creations

Wednesday, September 9, 2015

Show & Tell Mermaid Tail

Here's another show and tell project. This one is made from my mermaid fin pattern. Donna sent me a picture of her beautiful finished mermaid tail. She added some wire so the fin will keep it's shape. Brilliant! I wish I could make the picture bigger to show off the details. Thank's for sending the pic, Donna!

Do you want to make one for yourself or a loved one? Click here for the free pattern. 


Have you made something from one of my patterns? I would love to see it, email me!

Tuesday, September 8, 2015

Show & Tell Classic Cloche

Check out Kimmy's lovely classic cloche! I love her braided adornment, it makes it unique. Very nice job! Thanks so much for sending the pics of your finished product. Do you want to make your own? Click here for the free pattern.


 Have you made a project using one of my free patterns? I would love to see it. Email me!

Tuesday, June 30, 2015

More American Girl Doll Clothes

  Here is the blue and silver dress I was working on. I wish it was this quick to make clothes for myself! This dress pattern can be found on ravelry.com. It is Classic Navy Girl Dress by Dash of Bella. The silver chain can be removed and a ribbon or something else can be added to give it a different look. 

  The headband is also by Dash of Bella and is a free ravelry download found at this link. I made a blue one and a silver one since they were so quick to work up. I also added some bling to the silver one to match the shoes. 

  For the shoes, I used part of Whistle & Ivy's free pattern called Little Dot Mary Janes. I used the newborn size. They can be found on the site here. They also have a ton of adorable baby shoe crochet patterns on that site. I've made some before in a previous post


Monday, June 29, 2015

Show & Tell Crochet Tie

Here is a lovely picture from Sue of a tie that was crocheted as a gift for Father's day! Very stylish! She made the bottom of the tie square instead of the triangular shape that the pattern makes. I know I've said it before, but that's what I love about crocheting - the versatility.


                  Have you made a project using one of my free patterns? I would love to see it. Email me!

Sunday, June 28, 2015

American Girl Doll Clothes

  Recently I've been reminiscing about my doll playing days. If they were around when I was a kid, I would have wanted an American Girl Doll. It would've been one of those things I really wanted, but could never get because of the cost (kinda like that cabbage patch kid I never got).

  Anyway, I'm here to talk about the cute little outfits I made for my coworker's daughter. She just got an American Girl for her birthday. I told my coworker that I may be able to make something for her, so we looked at some patterns on Ravelry and he had his daughter pick some out. I didn't have a doll, so using a pattern would take all the guess work out of sizing.

  I still wanted a doll, so I could maybe practice my sewing skills sometime and have a little model for sizing. Luckily my neighbor found an 18" doll that's been in her daughter's daycare for a couple months. No one has claimed it, so they said she can have it. She knew I was looking for one so I can take pictures of my work. That worked out really well. Also, since her daughter isn't really into dolls, she parted with it quite easily.

  The pattern that was used for this adorable dress is found on Ravelry.com called American Girl Doll Summer Dress by Danielle Bonacquisti. The hat was inspired by a free pattern called Ice Queen Hat Pattern by Mango Tree Crafts and can be found here. I used the pattern for the base of the hat, then I made a floppy brim to finish it off. The shoes were made with a free pattern as well, but I cannot seem to find it. If I happen to find it again, I will update this post with the link.


  Isn't she adorable? More little clothes to come. I'm working on a blue and silver dress. 

Saturday, June 13, 2015

Show & Tell Floppy Sun Hat

Check out this lovely Floppy Sun Hat created by Priscilla! Thanks so much for sending the picture!


                Have you made a project using one of my free patterns? I would love to see it. Email me! 

Sunday, April 26, 2015

Crochet Baby Shoes

  I've been working on some really cute baby shoes lately. My cousin requested some faux Converse, then some baby boat shoes. Then I got another request for some girly baby shoes, so I made the little mary janes. They are all so cute! You can find links to the free patterns below.


  The Converse shoes were a little intimidating, and being that I haven't had a little one in a while, I forgot how big a 6 month old foot would be. The first pair that I made were way too big. They were most likely a 1 year old size. I used a pattern that I found on Ravelry. The yarn I used was bigger than what the pattern called for and so was my hook. Since it was my first try, they weren't so cute either. I guess they were cute enough that my neighbor wanted to take them home, so now they are gone. On my second try I found another free download on Ravelry. This time the sneakers may be a little on the small side, but at least they will stretch a little. The first pic is unfinished (missing the stripe) but it shows how tiny they are in my hand.


  Next up are the baby boat shoes. My cousin decided that she also wanted some of these little cuties for her little one. The pattern is from Whistle and Ivy. It is an awesome blog well worth checking out. I used the size for a 6-9 month old baby. They are a little bigger than the sneakers, but not much so either I crochet too tight, or they are just right. I guess we'll find out. These shoes took a little assembling, but overall not very difficult. The blog also has links to her videos to go along with her patterns for the visual learners.


  Last by certainly not least are the baby mary janes. The pattern is from the same website as the boat shoes so the sole is made similar but this shoe is worked in the round. They were really quick to work up too. I guess the only thing that slowed me down was finding buttons small enough. My mom requested these for someone's baby. These are also made with the size 6-9  month instructions.


Saturday, January 31, 2015

Show & Tell Crochet Tie

  This picture was sent to me this week. She made it her own with slight width variations. I love the colors she used and how they blend together. Check it out! Get the pattern here.


Have you made a project using one of my free patterns? I would love to see it. Email me! 

Wednesday, January 7, 2015

Do you want to build a Snowman?

   One day I was thinking about crocheting a snowman. We don't have any snow right now, but it would be perfect for this time of year. I was looking online for some inspiration and I came across a free pattern for Disney's Olaf from the movie Frozen. Click here to go to the pattern. I love how it came out (after a few boo boos that I had to fix).

   When I put the eyes on, I started my count from the wrong side and ended up with an upside down head. Whoops! I probably would've put it together like that had it not been for my daughter who pointed it out. I almost gave up on it at that point because you can't remove safety eyes without cutting the plastic piece off and the head was already stuffed and closed off. There was no way to get to it. Luckily, the felt piece for the mouth was big enough to cover it. So I glued it on with some fabric glue and you can't even tell where I messed up. (Unless you feel for it.) I opted out of making the crochet arms. They just hung there, and I didn't like that. I had some leftover brown pipe cleaners from my Baby Groot project and stuck it through his body. It took a minute to figure out his fingers. In all the pictures I saw of Olaf, he has 4 fingers, so I cut another piece of pipe cleaner for each hand and twisted them together. Overall he is very top heavy and floppy, but I actually got him to stand up for his photo shoot. I was thinking next time instead of sewing his head on, maybe I'll use velcro so it can be detachable.

   Looking at the bottom half of his body gives me ideas for Baymax from Big Hero 6. Stay tuned.


Saturday, October 11, 2014

Quick Easy Winter Beanie Tutorial

  I've been meaning to make this video to go along with my pattern for a long time. I finally got a chance to get to it. It's my first time actually talking in a video. It was a little weird at first and I ended up recording over my initial audio. Let me know what you think. Some parts are a little slow going, but overall not so bad for an amateur. Here's the video:


Click here for the link to the written pattern.

Tuesday, July 29, 2014

Mer-Baby Headband

  I made a matching baby headband for the mermaid tail. I found the free pattern at this link. I sewed on one of the starfish that I crocheted. I can't wait to see some precious baby girl modeling my creations! What other photo props can I make?


Wednesday, May 7, 2014

Crochet Flat Cap

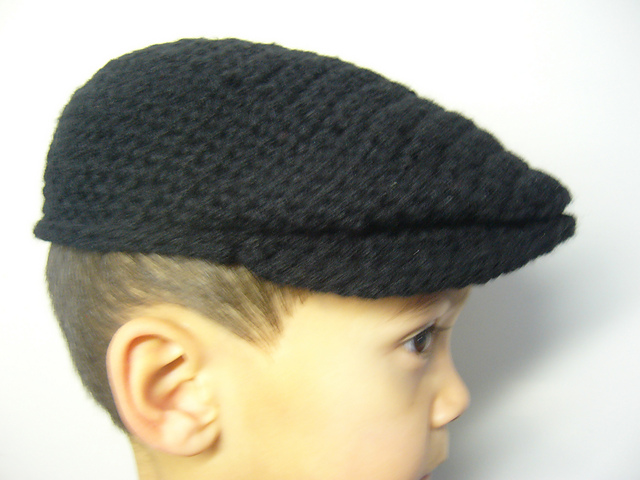
  A few years ago I was searching the internet for a crochet pattern for a flat cap. The only one I found was a knitted hat and there was no pattern. Eventually I came across Men's Jeff Cap by Ken Jones AKA Crochetguy. It was the best flat cap pattern out there at the time in my opinion. If you've been with me for a while, you might remember that I made this a little over 3 years ago, and as you can see it is a bit small.


Even though I wanted it small, the first one I made was for myself and it was too small as well. I never got around to tweaking the pattern. I found another pattern recently and my hat turned out much more to my liking. It's a free tutorial by OneVirtuousWoman. She said her inspiration was from the Jeff's Cap pattern. I found her tutorial on YouTube. Click here to see it.

Here's my newest flat cap, or as she calls it "Crochango" as in crochet kango. Yea, why didn't I think of that?


Tuesday, April 22, 2014

Show & Tell

     I have two to show today. First up is Laresa's cell phone case. It's a lovely spring yellow and the butterfly is too cute! She added a button and a strap. Very nice! Click here for the free pattern.


     Next is Nancy's floppy sun hat. I like how she mixed it up with a different color brim. Click here for this free pattern.


     Thank you so much, ladies, for the lovely pictures! Have you made a project using one of my free patterns? I would love to see it. Email me!