Showing posts with label sewing. Show all posts

Friday, March 4, 2016

Pillow Talk

  I crocheted this pillow cover about 2 years ago to cover up my bad sewing job. It was a simple stitch made with a large crochet hook. I think it was a half double crochet, but since the hook was so large it gave it this mesh look. I don't think I wrote a post about it because, well, it's kind of ugly.


   I finally gave this pillow a proper upgrade. Both my sewing skills and crocheting skills have improved since then. I unraveled my mesh cover and saved my yarn for another project. I thought about using it for the back, but decided to go with some leftover fabric that matches everything else in my craft room, as you can see on the chair that it is on. I made six panels inspired from the book, Crochet! Techniques, Stitches, Patterns by Marie-NoĆ«lle Bayard. Three panels of vertical ribbing which is just alternating front and back post double crochet and three panels in a stitch called triangular leaves. I think it is much, much better than the original. I sewed the two sides together with my sewing machine leaving one end open to stuff the pillow in. Then I hand sewed it closed. I like how the blue color comes through the open leaf stitches.


Front

Back

Saturday, March 28, 2015

Zipper Pouch

  Lately I've been playing with clay and practicing sewing with a few projects. I found this video by Melly Sews for creating a lined zipper pouch. She does a great job explaining everything. I made this pouch to hold all my new clay tools. I don't have that many, but I wanted to keep them all together. It would do no good to add more mess to my messy craft room, so a sewing project and a bit of organizing is great for me. I'll show off some of my clay creations in another post.


   I used one of those Single Fat Quarter cotton pieces that you can get at Walmart or you can get them in bulk online at Amazon. The one I used was 18 by 21 inches, and was more than enough fabric. For the lining, I used a piece of cotton from an old bed sheet. The corners next to the zipper are a little weird, but it looks like it was done on purpose, so no biggie.


   Speaking of that old bed sheet... It was a king sized sheet and gave me lots of fabric to practice on. I made a few of these aprons, and I still have more to play with. I used the scraps from my Fat Quarter to make a small pocket. The sheet was going to end up in the trash since it had a huge hole in it, so why not upcycle?


Monday, February 16, 2015

Refashioned Beach Dress


  Do you ever go to the beach and end up buying stuff you'll never use? ..or is that just me? Well, if you haven't guessed, I bought this dress on a beach trip. I don't even remember which beach. Everything seems to look better at the beach. Maybe if you live on a beach you wouldn't think so, but I don't and in fact, it is snowing here, right now.

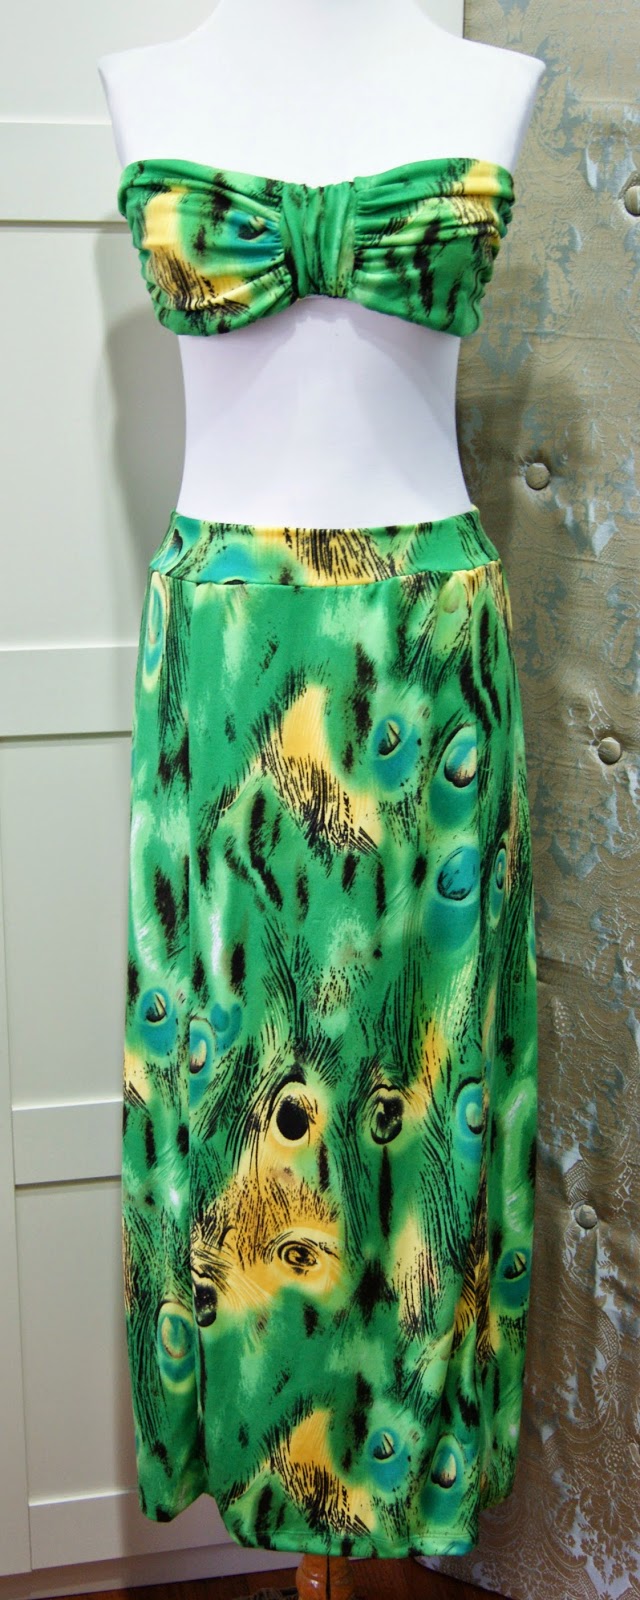
  I love the fabric, but I didn't really like the top part of this dress. I'm not so busty and can't pull it off, so I decided to turn it into a maxi skirt.


  First, I held the dress against me to the length I wanted it. I folded the top and cut at that point.  It came out to be 3 inches shy of what I would cut a maxi skirt for myself at, but I'm going to use part of the top as a waistband.


  After cutting, I had to make my lines a little straighter and cut one seam so I can make it smaller.


  I made it to be 4 inches smaller than my waist because the material is really stretchy. Then I sewed the band closed again to make a circle and folded in half lengthwise with right side out. I tried to hand baste a loose straight stitch, but ended up taking it out because it didn't allow the material to stretch enough to pin it to the skirt.


  I think this is the hardest part for me - putting these two pieces together. I placed the band on the outside of the skirt and evenly pinned the two together. Sewing was a pain because I had to stretch the band as I went to match up with the skirt. I guess I need more practice with that because I had a couple holes. I had to go back over to get it right.


   I think I got it right, and I'm diggin' my new skirt! I don't know what I'm gonna do with the top part. I'm past the days when I would wear it like that! Maybe I'll make some type of headpiece.


Sunday, February 1, 2015

Sweater Refashion

   I realize that to get better at sewing, I'm going to have to practice. I refashioned one of my husband's old sweaters into a skirt. I didn't take enough pictures to make a tutorial, but click here for a link to one with really cute skirts. I should've put elastic in the wasteband, but other than that, I think it looks cute!


   Next was my weekend project. I wanted a cowl neck hoodie. I used a couple sweatshirts that I had as a pattern. I am very happy with how it turned out. Not so bad for a beginner, and it's something that I would actually wear in public! I must say that fleece is very forgiving.


Monday, April 21, 2014

Skirt and Matching Swag

    Here I am messing with my sewing machine again. Isabel actually started making this bag right after I made mine- Funky Little Bag. I used the extra fabric to make a skirt, or attempt to. I don't know what happened, but my measurements were way off and I ended up with a skirt that would fit one thigh and a half... maybe. I was trying to figure out how to save it with the least amount of work. I know, sad but true. So I used some scrap fabric from the circle skirt I made recently. My original idea was to add a piece to each side, but after the first side was added it was just the right size. Remember, we're going for minimal work at this point, so I decided to leave it as is. It doesn't matter how you get to fabulous, just as long as you get there. Right.. Needless to say, I am happy with the outcome.


     Like I said earlier, Isabel started the bag and like most teens with short attention spans, she got bored with it. Whatever her reason, she was taking too long to get back to it and it was taking up space in my craft room, so I finished it for her. I can't force her to like sewing. I added an insert with an inside pocket using the same fabric that I used for the side of the skirt. This bag is the smaller version of the other one I made. If I make another I think longer straps would be better. I think I had an issue with the straps on the other one too. Oh well, you've got to live and learn.


Saturday, March 15, 2014

Funky Little Bag


   Ok, this was an accomplishment for me. I used a sewing pattern for the first time, and it wasn't a total disaster! I must have bought this pattern about 2 years ago and never got the nerve to actually do it. It's just a bag, so when I brought it home I thought, how hard can this be? I pulled everything out of the package, took one look and put it right back in. It sat in my drawer for all this time. Since I've been sewing more lately, I figured it was about time to give it a try. I took my time (it took all week) and stuck through the frustrating parts. I have to say I'm pleased with the outcome.


   I think I had the most trouble with the straps and figuring out the bottom corners of the bag. The straps were a problem because for some reason I can't sew completely straight. So you can clearly see my lack of sewing skills. I'm still happy with the final piece. All I need now is a liner and it is ready to hit the road. I think I will make the inside bright orange. Since it's an afterthought, it won't be as good as if I had sewn it in before, but it will make the inside look much better. Right now I have fraying ends and seams showing on the inside.
   I thought the zipper was going to give me problems, but it was surprisingly easy. I did watch a video on zipper foots before I sewed mine. That helped a lot.


   I love how the pockets go all the way around in different sections. If I make this again, I might do something different with the straps. Maybe make a long tube, so I don't have that middle (crooked) seam showing all the way through. 


Wednesday, February 19, 2014

Sewing project

   I think I might be getting the hang of this sewing thing. Of course I could definitely use some more practice. I got some cheap fabric from Joann's the other day. I'm too scared to mess up any good fabric, so I just stick with cheap and recycled for now. After watching multiple videos on different kinds of circle skirt sewing techniques, I made one that I wouldn't be embarrassed to wear in public! The material was a little difficult to work with. It's a 100% polyester bridal satin. I think a jersey knit or something with a little give would have been better. The biggest challenges for me were sewing the elastic and the hem. I didn't give up though, I pushed through. I actually stretched the project out over a few days, but that's ok because I still came back to it and finished.


   What do you think? I think Isabel likes it. Just watch her twirl! 


Wednesday, July 18, 2012

Refashioned Army Shirt


  I took one of my old Army tee shirts and made a cute tank for Isabel. She's actually wearing this in my last post. We had ourselves a little photo shoot and just got everything photographed.
  This shirt was simple. First I cut the sleeves off, a few snips across the top to square it off, then fold it over and sew to make a casing for the straps. I cut the hem off of the bottom to use for the straps. Thread through and tie together. I cut a slit on each side at the bottom and tied the ends together to make it a little more fitted.

Wednesday, May 9, 2012

Learning to Sew


image from www.clker.com

   I've been trying to work on my sewing skills. Right now they are practically non-existent. I did mend some things that are now in better shape than they were. Isabel's gym bag was ripped, so that is now as good as new (in a thrift store kind of way). Isaiah's bookbag's bottom was shredded to bits. No wonder he kept losing his pencils, they kept falling out of the holes! I sewed in a vinyl insert so he won't lose anything else. I should have taken some before and after pics. I'll remember to do that next time. I'm currently working on re-fashioning my husband's unwanted dress shirts. I'll do another post on that once I finish, and possibly a tutorial, if I can manage to do it again.